
by Howie Grunert
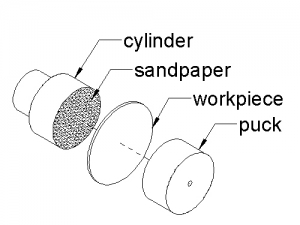
If you need to turn a disk, especially a thin one that cannot be clamped in the lathe’s chuck, then read on. You will need to make a simple fixture first. Start out with a cylinder of about Ø1-1/2” and about 1-1/2” long; dimensions are not incredibly important. Face one side of the cylinder, turn it around in the chuck, and then turn a reduced diameter to about Ø1” on this end for about half its length, leaving the shoulders square. You should now have what looks like a fat, short, T-shaped part with a finished top when looked at from the side.
On the end that was faced originally, apply double sided tape to the entire surface and cut up some 100-grit emery paper and apply it to the double sided tape. Trim the excess paper off. If you put the reduced diameter end back in your chuck and allow it to bottom out on the chuck jaws, you should have a sandpaper finish in the vertical plane sticking out from the chuck.
The last part to make is a puck, about Ø1-1/2” and 3/4” thick with a small, blind hole in the center of one side. That’s all you need. Both of these parts can be made using anything from plastic to aluminum to steel.
With the sandpaper part mounted in the chuck, put the work up against the sandpaper surface and center it as best you can by eye. Now, put the puck against the work with the small hole on the outside. You should now have a sandwich, with the workpiece held between the sandpaper and the puck.
Bring the tailstock and a live center up to the puck. Ensure that the point of the center doesn’t go all the way through the puck. Lock the tailstock to the bed and run up the tailstock spindle until it’s tightly compressing the workpiece in the sandwich, then lock the spindle in place. The amount of pressure applied by the tailstock is very important, as this determines the holding power of the system. The sandpaper offers friction to drive the work and the tailstock supplies the clamping pressure via the puck.
You can now run the lathe and turn the work. Take light cuts, especially if the work is on steel or brass. Of course, plastic and aluminum can be cut a little more aggressively. The dimensions given for the holding fixture are for small diameter work – make larger parts for larger work. Remember, the work is only being held by the friction of the sandpaper and compression forces, so take care. This system does work very well and I hope it helps the readers with those hard to hold parts.
Thanks Howie! Your subscription has been extended by an issue!
Please do us a tremendous favor and share this tip with your machining friends!